The Raft Elves

[Click for a larger image]
 own the swift dark stream you go own the swift dark stream you go
Back to lands you once did know!
Leave the halls and caverns deep,
Leave the northern mountains steep,
Where the forest wide and dim
Stoops in shadow grey and grim!
Float beyond the world of trees
Out into the whispering breeze,
Past the rushes, past the reeds,
Past the marsh's waving weeds..."
|
J.R.R.T, The Hobbit: "Barrels Out of Bond"

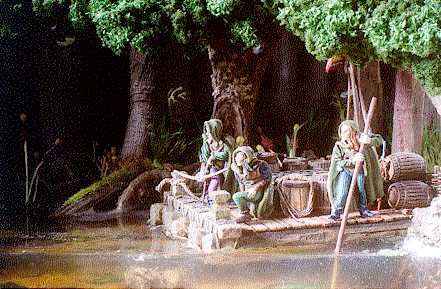
In the picture above you see raftelves on their craft,
emerging on the Forest River from under the branches of
Mirkwood into the morning sun as it raises above the Long
Lake. The raftelves, being the subjects of the Elvenking
and his trade agents, carries with them from their villages
and homesteads along the Forest River woodland produce to trade
in Esgaroth and further away places for wine, food stuff and
other wares with which they can fill their empty barrels. It
was the raftelves that collected and floated the barrels in
which Bilbo and the dwarves fled the Elvenkings Halls. It was
also the raftelves huts that the Bilbo with the help of his
magical ring raided for food during the cold and wet journey from
the Mirkwood to Lake-town.
This scene belongs in the same six-compartment theme cabinet as
'Riddles in the Dark' and four other 'The Hobbit' scenes. It
is based on Mithril Miniature's M134 in the 'Lake-town' series.
The raft supplied is much to small and unraftlike (probably
because it needed to fit in to Mithril's standard blisters) and
this made it quite useless for a credible shadowbox. The figures
are excellent though; both rafters look cautious, fey and exotic
but also have distinct direction and purpose in their stances. The
third elf is not from Mithril but from Prince August's line of
fantasy figures. I added it since the raft looked a little empty
with only two elves on it and because it had a similar pose and look
as the others. This is a very important aspect about miniatures when
you're putting together a diorama. The scene will not look credible if
the miniatures are not similar in poses and expression. Therefore the
theme of a scene will often be decided based on what miniatures you
can find, at least when working with metal miniatures that are hard
to convert.
Jonas, the photographer, and me spent quite a lot of time on this scene (it was the first one for both of us
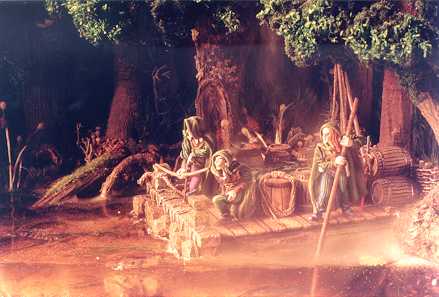
). We experimented a lot with shutter time, angles, filters, flashes, lighting and what not. The picture at the top is pretty much the same as the one to the left part from only a few factors. The one above was taken with a rather hard white light, giving an impression of a bright morning. The one to the left was taken while we gently blew cigarette smoke through a narrow tube onto the scene. This demanded softer light and longer shutter time, and even though the smoke dispersed faster than we hoped the result was pretty much that of evening fog on the river at dusk. These pictures go to show that miniature photography can be a hobby in its own right. I have yet to master it and I am very happy to have Jonas to rely on in this matter.
The Forest River and the boles of the surrounding Mirkwood was one of the most rewarding pieces of groundwork I have done. I think most people who have read 'The Hobbit' have a very clear picture of the darkness and density of the ancient forest. So do I and my idea was to get the trees and undergrowth to look as huge and imposing as possible in a scene only 20x10x15cm big. I started by building up the bank with styrofoam on a plywood base. I had on one of my walks cut a few short sticks with the right diameter,
'branchiness' and texture of bark, which had now dried properly and could be cut into the right lengths. In a scene like this you of course
do not fit a full tree in, but that doesn't matter. You can't see a whole big tree while
you are in the woods ether, not without taking quite a few steps back anyway. I fitted the miniature boles onto the bank and also split a few of them in half and glued them to the back piece of the box. I glued some smaller twigs in place as roots at he bottom and sculpted epoxy putty in the joints where they met the boles. The boles hardly needed painting except
a simple basecoat of dark brown and a light dry brush on the putty parts.
The floor of pristine, wild forest like the Mirkwood are covered with branches and logs of trees that have died a natural death. To represent this I covered the ground in acrylic spackling and pressed twigs, sticks and pebbles into it. I also stuck other bits into the side of the bank to simulate roots and branches visible in the Forest River. The ground was then covered in several thin layers of colored sawdust, starting with the darkest up to the lightest.
These are meant to be fallen leaves. Woods as dense as the Mirkwood seldom has much ground vegetation but I added some dense thickets of light green colored asparagus twigs for fern to get some contrast in the gloom under the trees. I also made some mushrooms out of pins and small nails and which were painted and stuck in small clusters into the ground. I also put some fungi made of epoxy putty onto some boles. Moss also adds some color in woods, so I some finely granulated flock on some of the logs and rocks.
I started making the riverbed by pushing some rocks into the still soft spackling. Sand and smaller rocks form in certain patterns in streams so I took care in looking at pictures of dry riverbeds before applying sand and smaller pebbles to it. The whole thing was then painted. The bottom of forest streams can vary from the blackish browns of the calmer areas through reds and grays to the tan sand colors of the more turbid areas. Once again photographs helped me picking out the right colors. While the paint was drying I cut hemp fiber to the right lengths and later glued them in place with heavily diluted white glue. I placed the upstream end by a natural anchor point; behind a root or by a rock, and swept the strands down streams with a large brush dipped in diluted white glue. When this was dry I painted it with clear the emerald colors often found in under water plants.
Now time for the water itself. I have earlier made successful attempts of casting calm clear waters with a clear two part epoxy resin but
that material is smelly, messy, expensive and will last in its jar for only a limited time. It take comparably long time for it to set thoroughly to. That's why I was very happy when I found Woodland Scenics E-Z Water. It is originally a model railroad material that comes in crystals, which you melt on the stove and pour onto your diorama, and this is exactly what I did.
Well, before I did I first had made sure the raft was complete. As I said above the original raft of the miniature set was not very convincing, and this made me construct on of my own. It was made round sticks carved to a more natural rough log look and which were tied together and crossbeams and planking was glued to them. Now with the raft all done I would make I had something that would float in the water I was about to pour. There is one thing you have to be very careful with when making dioramas and that is fixing things in place permanently too early. More often than not you need to go back and correct things and by then you might need to break the diorama apart. I have done this mistake a few and learned that the best thing is not to fixate things at all. So what I did this time was that after I had brown-washed and drybrushed the raft I clad the bottom of it in aluminum foil and made sure if fit very snugly. I then propped the craft at the right height above the riverbed with the help of nails through the decking. Then all I had to do was to pour the E-Z Water and when it had set I simply lifted the raft out and pealed of the foil. The raft could now be taken in and out of the water as much as I wanted.
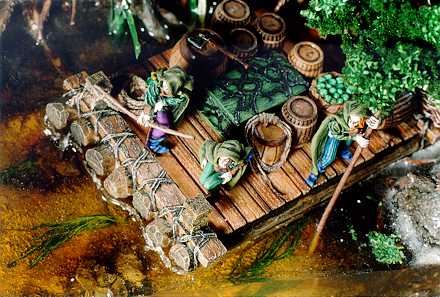
The cargo and other details on the raft were made from various odds and ends from my bit box. Two of the barrels were included in the original kit; the rest were from a model railroad accessory kit. (When doing a Raftelf scene, it feels like lots of barrels are obligatory. I just wish I had put one floating in the water somewhere to.) The wicker fence at the back of the raft, behind which the raftelves could hide from biting winds or orc arrows, was made from brass wire woven between pins. I made the treasure coffin in the middle of the raft from strip wood, which I also reinforced with coils of epoxy putty painted to the likeness of wrought iron. Weapons onboard, the slender Sindarin battleaxe and the longsword, ware taken from a Thunderbolt Mountain sprue. The combined mast/pole rest and the poles themselves were made from toothpicks. I felt that the elves were would signal their allegiance somehow so I invented a likely symbol for the Elvenking: a green leaf. This was painted on lead foil, which was later gently bent to shape and hung in the mast.
The color scheme is pretty obvious when painting woodelves (mostly greens and browns) but since these were raftelves I wanted to give them a slight cultural variation of the theme. I pretty much went what is said in one of the supplement sheet, which used accompany each one of the earlier series:
"[The raftelves] wear long blue-green cloaks and carry daggers rather than swords."
Now, the cloaks weren't made blue but I used that color in the inner garments to make the figures distinct.
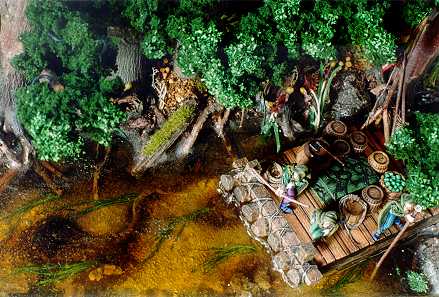
As you can see in the picture to the right, I made sure the pole in the hand of the raft elf was long enough to touch the bottom. I had to drill a hole in the E-Z Water especially for this but it really made a difference. It can't bee seen very well in the pictures but makes the scene look much more real. The rafter is really putting some weight on the pole to hold it back and the part under the water gets a little bent and distorted just like it would in reality. It is always amazing how small details like that can make such a big difference and I believe it s one of the factors this is one of the pieces I am most happy with.
Back to the top
Back to Scenes from Middle Earth
Peder Hammarskiold ph@shapingmiddleearth.com
Copyright Peder Hammarskiold 1999 All rights reserved.


